Tuesday, April 30, 2013

Paper Plate Fish (Peer Lesson)


     I, personally, really enjoyed this project.   This lesson was introduced by discussing patterns and differences between various simple shapes, etc.  This project allowed us to be creative and incorporate other subject areas into this simple, yet fun activity.  This is ideal for younger students, but can also be broadened and more detailed for use with older grades. 
 
 
          Instructions:
     1. We were provided with paper plates that had large squares already traced onto it. 
     2.  Each student determined which three basic geometric shapes we wanted to incorporate to create the pattern within the squares of the paper plate.  We practiced these first on scratch paper before drawing them on the actual paper plate. 
     3.  We then drew and colored in the pattern we selected for our own plate. 
     4.  Next, we completed the remainder of the fish by coloring in the rest of the paper plate in a design we created. 
     5. We cut out a mouth for the fish and used the cutout for the mouth as a fin on the fish.  We then drew on gills and added eyes to complete our project. 
     6.  The teacher added fishing line so that we would be able to hang and display our own individual fish.  

Scrapbook Quilt (Peer Lesson)


     This project allowed us to use our creativity to create our own paper quilt that represented our interests or things that we like.  We used scrapbook paper as the pieces to our quilt and added patterns within our design of the quilt.  This lesson can be simplified to be used in younger grades, or expanded and made more detailed to be used with older students. 

     Instructions:
1.  We selected eight sheets of scrapbook paper that we liked or thought related to our interests or lives.  We also picked up squares and circles that were cut out to be used to trace on our sheets. 
2.  We selected four of the scrapbook sheets and traced squares onto these sheets, then cut them out.
3.  The next step was to trace four circles onto the remaining for scrapbook sheets and then cut these out. 
4.  We were then to cut each circle and each small square into quarters. 
5.  We arranged, then possibly rearranged the smaller quarters to create designs to resemble that of a patchwork quilt.  We placed the created circles inside of our created squares and determined the way that we wanted to have these placed on our background sheets. 
6.  We then glued down the pieces to the quilt and decorated the border of the paper quilt we had created. 

Clay Pinch Pots (Peer Lesson)


     This project incorporated the use creating a pinch pot with clay and using symbols to represent ourselves or important aspects of our lives.  We first learned about ancient civilizations and how they used pottery and the symbols they incorporated into their pottery.  One good thing about this media is that clay can be used in varying levels of complexity, and therefore, can be used in younger classrooms or with older students. 
 
    
     Instructions: 
  1.  We first put newspapers down on desks to protect our area. 
  2.  We were then each given a 'lump' of clay and was asked to knead the clay to remove air bubbles. 
  3.  Once the clay had been kneaded, we rolled the clay into a ball and pressed our thumbs into the middle of the clay and turned it in a circular motion. 
  4.  When we had shaped the clay into a pinch pot of the desired size and thickness, we smoothed out the surface with our fingers and water. 
  5.  Then we carved our designs and symbols into the pinch pot and allowed the pot to dry. 
  6.  Once dry, we painted the pot and added any remaining symbols that were not carved into the clay. 
  7.  To finish this project, we needed to create a symbol key explaining what each of the symbols meant to us or represented. 


          Extension Activity:
     One particular activity I found to extend this lesson was to use the same techniques as we did with our clay pinch pots to create ceramic animals- in this case, fish.  It is not much more complicated than the pinch pot, except for having to mold the clay into the shape of a fish rather than a pinch pot.  This would be for a lower elementary classroom, and can be used when studying fish or during an art class. 


Jasper Johns Name Art (Peer Lesson)

 
     This lesson was a great way to introduce patterns and how patterns create unique and creative projects.  We were first introduced to the works of an artist by the name of Jasper Johns who incorporates patterns and repetition to create his own artwork.  We were given an opportunity to create our own patterns and use primary and secondary colors in our art. This is yet another example of an activity that can be used in more simple ways to be used with younger students, and then expanded on to be used with older students. 
 
          Instructions:
     1.  We were provided with one large sheet of white construction paper and selected a stack of colored construction paper for this project.  We were asked to fold the  white construction paper into sections of 12.  We then glued the smaller squares of colored paper onto the white paper- alternating the colors in a checkerboard design. 
    2. We were then given oil pastels to create our name writing letters in a pattern format onto the papers. We were encouraged to apply lots of pressure to create bold lines. 
    3. Teachers then demonstrated how to use watercolor paint over the white pieces of paper and how to mix the colors to create secondary colors and shades, etc.  We decided which colors we wanted to use and painted them onto our own white sheets. 
    4.  Before displaying our pieces, we needed to allow the pieces to dry as the watercolor paint on the paper made it a bit soggy. 
 

     Extension Activity:
 
       A fun extension activity I found would use a similar technique of creating pattern onto a piece of paper, but would be in the shape of a spiral snake.  Each section of the snake would need to be detailed using crayon or oil pastel and then covered with watercolor paint to show the resistance to the crayon or oil pastel.  This could be incorporated into science to show resistance and how the paint resists the crayon or pastel used for the patterns within the overall spiral snake pattern.  


Springtime Printmaking (Peer Lesson)


     This lesson provided an opportunity to create new patterns and textures into paper, which we then used to create a springtime design or object.  I chose to create a flower as I love all things floral and thought it would create an interesting spin on a flower than I would traditionally see.  I chose to use Qtips, a few different sizes and textures of sponges, a plastic fork, and the wheels to a toy car to create the patterns for this project.  This is a lesson that could truly be used for any age group- moving from large, simple outlines and patterns to more complex and detailed objects.   

            Instructions:
     1. First, we brainstormed a spring object to draw on our large sheet of construction paper. 
     2. We then drew the object lightly on the paper using a pencil- which acted as an outline.  We were encouraged to use as much of the large piece of construction paper as possible.
     3.  Then we laid down newspaper to protect the tabletops from the mess of paint that we may get on it. 
     4.  We were then shown the various materials we could incorporate to create patterns and textures onto our papers.  Once we were shown these materials, we were able to test out (on scratch paper) and then apply these materials to our own papers to create various prints.  We were encouraged to fill up our paper using lots of different colors and prints and to try to avoid white spaces, if at all possible. 
     5.  We allowed our paintings to dry, and then cut out the objects once the papers were dry and assembled them to create our finished project. 


          Extension Activity:
   A fun extension activity I found online was to create textures onto a piece of styrofoam and then transfer the print onto a different sheet of paper.  I really feel that this activity can be used for all ages of students- ranging from very simple to more complex designs and patterns. 
        

Melting Into Spring: Crayon Melting (Peer Lesson)


     For this project, we used melted crayon shavings on wax paper to create a cute little spring object with a creative effect.  I really enjoyed this project and the way it turned out, and hope that I will be able to incorporate this into my future classroom someday.   

     Instructions:
          1. To begin, we shaved crayons and saved the shavings to be used for this project. 
          2. We then placed the crayon shavings on wax paper- taking into consideration that we would need enough shavings to cover the space that we wanted to outline our design onto. 
          3. The teacher then used a hot iron on the wax paper to melt the crayon wax.  Students used their fingers, if they wanted, to blend the colors and create various designs within the melted wax. 
          4. Once the wax was melted, we traced our design from a laminated outline copy with permanent marker onto our wax paper on top of the wax.  We then cut out the design. 


     Extension Activity:
         A related activity that I think is really neat is the flower project shown above.  Students would use a similar technique of shaving crayons in various greens, which the teacher would melt in a way that it could run down the page rather than using wax paper as in our lesson in class.  This could also be used as a springtime project, or to show the changes made to a specific medium when heat is applied (change within an object)- which could be incorporated into a science class. 

Yarn Eggs (3D Design- Lesson)


     For this lesson, Amanda and I drew the 3D design concept of art.  We decided to incorporate springtime into this lesson to make it more relevant and interesting.  We had the students complete a 3D yarn egg created over a balloon.  This was a fun and messy way to bring art into the classroom and I really enjoyed this project.  We began the lesson by reviewing terms found in art and math areas and then read a book relating to circumference to the students to relate the terms to the project that we were completing.  We also showed a brief powerpoint that went over the steps with pictures before allowing the students to work on their own. 
 
     Instructions:
          1.  Students will be given balloons, glue mixture, yarn, and other materials needed for this project.  Students will be asked to blow up the balloons to a small size and tie the balloons off.  Once the balloons are blown up, students will take pieces of yarn that have been provided to them to physically measure the circumference of the balloon. 
          2.  Students will be asked to roll up sleeves or cover up any nice clothing while completing this project, as it gets quite messy.  The teacher demonstrated the process of dragging a piece of yarn through the glue mixture and using a spoon and the side of a bowl to scrape away any excess clumps of glue. 
        3. The yarn covered in glue was then tightly wrapped around the balloon with the lines overlapping to create a density in the lines of yarn on the balloon. 
       4. The project must be allowed to try before it's moved.  Once the yarn is dry around the balloon, the teachers popped the balloon to have only the dried yarn structure around the balloon shape remain. 


     Extension Activity:
           A fun activity I found to compliment this lesson would be the one shown above.  Instead of wrapping yarn with glue mixture around a 3D shape, it instead is laid out in swirls and different patterns on a sheet to dry flat.  Once it is dry, it can be displayed in a window for a fun and creative new way to display art or liven up a space.   


Blooming Into Spring- Crayon Resist (Peer Lesson)


     This project was incorporated into a lesson that taught us about the artist Georgia O'Keeffe.  We learned about the style that this artist uses and the concepts and techniques she incorporates into her artwork.  This project demonstrated the concept of the resistance created by oil pastels with tempera paint.  This was a very fun and creative activity, and I really liked that I got to be messy and make a drastic change to a piece of art.
 
     Instructions:
          1. We began this project by drawing an enlarged flower on a 9"x9" piece of drawing paper with either bright crayons or oil pastels.  I chose to use oil pastels as they are not a medium that I get many opportunities to work with.  We had to make sure to press down with the crayon or oil pastel very hard while completing this first step, to ensure that the later steps would work best. 
          2. The teachers then mixed black tempera paint with water in a plastic cup.  The consistency of the paint was very watery to ensure that it worked best with our project.
          3. We then painted the mixture over the entire flower drawing.  Next, we used either our fingers or a paper towel to move the paint in the direction of the petals and drawing overall. 
          4. The final step was allowing the painting to dry, as the tempera paint over the entire project was very wet when we finished painting. 


      Extension Activity:
    
   I think this would be a great project to use with either younger or older students in the classroom.  This can be used as an art activity in itself, or can be incorporated into learning about science and mixtures or how things change when added to with another medium.  I think I would probably use this method like in the example I found above with smaller areas of crayon or oil pastel to really show the contrast and differences of the piece when black paint was added. 

Monday, April 29, 2013

Hidden Safari

 
          This project was a lot of fun and incorporated a hidden picture which is something I have only ever seen previously, and this allowed me to create one of my own for a great new project.  For this project, we drew a simple picture of a jungle animal using light blue colored pencil and then hid the picture using warm colors to offset the picture we drew. 
        
          Instructions:
     1. We began this lesson by making 'magic ruby red glasses'.  These were glasses traced onto construction paper and cut out, then we glued red cellophane to the glasses to create the lenses.  These were set aside to be used later in the lesson. 
     2. Students practiced drawing several objects upside down- beginning with a simple pattern then moving on to more complicated drawings.  The professor explained that this technique of drawing upside down helps to stimulate our brain into completing a task in a creative new way, and to prepare our minds for the 'trick' of hiding the drawings later, only to have them be revealed using the special red glasses. 
     3. We then chose an animal from a packet of jungle animals.  I chose to draw a little elephant with a few trees in the background.  For this drawing, we were able to flip the picture the correct way to draw instead of continuing to draw the more complicated picture upside down.  The picture was lightly drawn with a light blue colored pencil onto construction paper. 
     4. Once our picture was drawn in blue, we began to layer the picture with warm colors- yellows, reds, oranges to create patterns and layers.  The layers that are added help hide the picture that was drawn, and helped draw attention away from the light blue marks on the page through the larger, darker objects I had drawn.  From time to time, it was helpful to use the red glasses to visualize where more warm colors needed to be added, and if there had been enough added.   
     5.   A frame was added to the project, and then we were really able to appreciate the effect of the colors we used to create a hidden picture.  In wearing the glasses, our eyes filter out the layers that were added on top of the blue picture, and we were able to see the color in blue clearly.   To finish the project, we added three clues to help other students guess what our animal and picture was of. 
 
           Extension Activity:
 
     I think this project is a great way to incorporate many different subject matters.  Obviously, this would be a great project to be completed during art time.  One of the best things about this particular project is that any and everything can be drawn in and then layered.  I can think of using this for many subject matters, such as drawing words or sentences for language arts, pictures for science, countries and continents for social studies, and math concepts for mathematics.  This is also a great way for students to spend free time when assignments are completed, and can be used over and over- which allows students for many fun and creative pictures to view. 

Eric Carle Inspired Story Collage


          For this project, we first learned about the artist and author Eric Carle.  We studied the method that he uses to create his own papers then later incorporates all of these papers into his art and books.  I really enjoyed this project and thought it would be great to incorporate into an upper elementary classroom.  The effect looks very complicated, but the process itself is alot of fun and does not seem to take as much effort as it looks at first glance. 

     Instructions:
          1. We began this project by creating our own Eric Carle styled papers by painting various colors and patterns onto a pieces of papers to be used in our project later.  These papers would be later used for the background piece, characters, and components of the story collage.   
          2. We created characters and decided on a scene from a story or created our own for our story collage.  Once we decided on the characters and components of the scene, we sketched these out on scratch paper. 
          3. Once selecting which papers would be used for background and collage pieces, we traced the shapes on the background and paste paper. 
         4. Pieces were cut out and assembled to create our collage and then glued down carefully. 
         5. The final step was to add lettering to the story collage to create our own storybook page. 


     Extension Activity: 


          For use in my future classroom, I would begin the lesson by showing students a similar video to the one we watched in class to first inform the students of the process that is followed.  For younger students, I think it would be great to work together as a group to complete an activity where students would paint backgrounds then cut out their own objects (much larger and simpler than those we created in class).  For older students, I would have them do the same process as we did in class, but ask them to complete a single focus of art- basically the same lesson for younger students, but more detailed and a bit more complex. 

Saturday, February 16, 2013

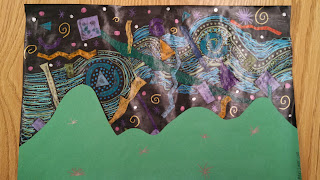
Van Gogh Inspired Collage


For this project, we were assigned to complete our own version of Van Gogh's "Starry Night".

We first completed the sky portion of the project using tissue paper on construction paper. For this area, we were allowed to use different shapes or patterns as we wanted. After the sky portion was complete, we used construction paper to represent a landscape to the project.

For this particular lesson, we used tissue paper, construction paper, and other media. For my collage, I incorporated metallic markers to add additional lines and movement to my work. To complete the project, we added cut out designs of a landscape.


For use in my own classroom, as I am hoping to be instructing younger aged students, I think it would be good to introduce this idea using finger paints.   First, the students would be shown Van Gogh's 'Starry Night' and then have a discussion about foreground, middle ground, and background, and the students would need to recreate their own version of 'Starry Night' using their fingers and paint as a medium. 


I believe that art history, like history in general, is an important way for students to learn about the past and how it things started or later came to be.  Knowledge of the past and individuals in the past may inspire or encourage students that may need an additional push to try something new or reach for a goal.  There are many ways to incorporate art history into the classroom including many fun games, projects, and activities.  SmartBoard games and activities would be alot of fun to get students more actively involved in history of art lessons.   

Saturday, February 9, 2013

Elements and Principles of Art

     The Elements and Principles of Art project was a great way to get more hands-on experience with each of these components.  Through finding our own examples of each component, I was forced to think deeper about what makes each element or principle individual (or for some- connected with others).   
     The following are my favorite 5 images that I included in my Powerpoint presentation. 


The picture above is a picture I took while on a train headed to Oregon.  This picture is one of my favorites that I have displayed in my home.  The components of this photograph provide a great example of space in a piece/ photo.  There are distinct areas in the photo- the close items (foreground), the items that are located towards the middle of the landscape (midground), and the trees and moutains in the furthest area from the camera (background).
 
 
The rose picture was to show contrast.  I love the way that the camera focused on the flower.  In this shot, I was able to see different areas of highlights and shadows, as well as crisp, focused lines, and other areas that are more blurred around the edges. 
 
 
The duck photograph included was to demonstrate the rhythm/ movement principle.  The waves flowing out in the water indicate that there is movement in the photograph.  Movements as indicated in the photo guide a person's eyes towards the direction that the ducks are moving. 
 
 
 The picture of my dog demonstrates the emphasis principle.  The placement of Drake on top of the snow between the snow and the trees demonstrates the main point of interest in the photograph.  The eyes of the person looking at the picture is drawn to the focal point, or the dog. 
 
 
The photo of the tree on a wall plaque I have illustrates the balance principle.  The symmetry shown in the tree shows that, though not everything is identical, the tree itself is symmetrical in shape and overall characteristics.  I love the sense of balance found in this tree. 
 

Thursday, January 31, 2013

Footprint

     This footprint project is a great way to introduce students and allows them an opportunity to share with others about themselves, their interests, and the things that are important to them. 
     For this activity, students are asked to trace their foot and then cut out the outline.  The outline of their foot serves as the canvas for this project, though students are certainly able to have areas that go over the edge a bit, if needed.  Students are required to incorporate three different media types into this project.
     My footprint consists of several different components of things that are important to me and my life.  These components are music, family, education, Green Bay Packers, travel, pets, flowers, and an area for a few of my favorite books, movies, and superheroes. 


     There are many other ways in which to get to know your students or to have them introduce themselves to the rest of the class.  An extension activity that can be incorporated is the "I Like Art Because..." activity.  First, read "Harold and the Purple Crayon" to the students to get their imaginations going and to give them some new ideas.  The students will then be asked to draw a small 'painting' to put on their easel.  They will also draw themselves, and will be asked to explain WHY they like art, which will be included in their work in a speech bubble.  Students will finish the activity by constructing an easel with popsicle sticks and putting the pieces together.